flytt!
Eftersom jag oväntat skaffade tumblr inatt så blev jag inspirerad att göra en helt ny blogg; som jag håller på att fixa och dona med just nu, så en länk till den kommer upp här någon gång senare idag! Här har ni min tumblr sålänge:
Since I unexpectedly made a tumblr last night, I was inspired to make a completely new blog; that's in the making right now, so a link to it will be posted here sometime later today! Here's my tumblr for now:
förlåt..
Förlåt (till er få men väldigt fina människor som faktiskt läser min blogg och tycker om den) att jag har varit totalborta så väldigt länge.. Det har hänt mycket men samtidigt väldigt lite under det senaste halvåret då jag har hållt mig borta från bloggandet och allt. Men jag håller på att jobba på en ny bloggdesign just nu, och har återfått mycket inspiration, så alldeles snart kan ni förvänta er nya inlägg, med mycket pyssel och bilder (så snart det slutar regna här i trista, gråa södra sverige,så jag slipper känna mig som ett vrak).
Tjolahopp sålänge!
Sorry (to the few, but very wonderful people who actually read my blog and likes it) that I have been so veeeery absent for so veeeery long.. A lot, but also very little has happened during the last few months that I've been staying away from the blogging and everything. But right now, I'm actually working on a new blogdesign, and I've regained a lot of inspiration, so very soon you can expect new posts here, with a lot of DIY and various arts and crafts stuff, and hopefully lots of photos as well (as soon as it stops raining here in the boring, grey parts of southern Sweden, so I won't feel so very down).
Toodles for now!
do it yourself: linen shorts with crochet lace

Shortsen som jag ska bära under min studentklänning (för att jag inte tycker om klänningar) är färdigsydda! Iofs ser de mer ut som ett par moderna mamelucker eller typ sovshorts, men jag gillar dem så då får resten av världen helt enkelt leva med att jag går runt i dem!
English;
The shorts that I'm going to be wearing underneath my dress for graduation (because I don't like dresses) are all done! Although they kind of look more like pantalettes or bloomers, but I like them, so the rest of the world will just have to live with it!
do it yourself: tote bag
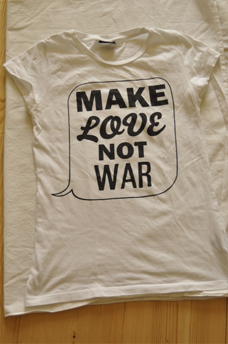
I had this old t-shirt that I never use because the fit looks awful on me, but I really love the print and so i decided to make a tote bag of it. To please you guys, I also made sort of a tutorial for this tote. Hope you can understand it. I'll do this in english since I don't have the time and energy to sit and write in two languages.

To make a tote bag like this, you'll need:
- Scissors (preferably fabric scissors).
- Any piece of fabric that's not very stretchy and preferably quite strong (I used an old linen bed sheet as the strengthening inside) but you can use whatever fabric you want (BE CREATIVE!), I only use the t-shirt for the outside because if you use a stretchy fabric for the entire tote, neither the seams nor the fabric will hold and it will tear up very easily.
- If you want to be careful with the size before cutting, you can use a measuring tape to make it more even (I trust my eyes though).
- Pins (I always find it better to use lots of pins because all fabrics tend to escape from me and end up where I don't want them).
- A sewing machine (you can sew by hand, but it will take forever, and unless you are really good at it, the seam won't hold. You have to think about the fact that you might put heavy things in your tote, and even if you don't, you're going to be dragging it around all the time and it will tear).

Fold your inside fabric (or if you only have one fabric) double, and put your outside fabric on top, also double. If you want to be careful, pin the fabrics together. If you only have one fabric, it will be fine if you put your fold as the bottom so that you won't have to sew the bottom, but when you have two layers (like me) it's a lot better if you have a seam at the bottom as well.
Now, cut it in the desired size and shape (mine gets a bit weird because the print is not in the middle of the t-shirt but i still wanted it in the classical shape). My tote is approximately 36cm wide (before sewing) and 46cm tall (before sewing).

Pin the two front layers together (in my case; the printed piece and one of the linen pieces), and then pin the two back layers together. Put them together with the outside in and the inside out (in my case; linen out, t-shirt fabric in). Pin them together. Start by sewing the right side and the left side (in my case; bot long sides), leave the top and the bottom of the tote open.

If you want to, you can cut along the outside of the seam to remove unneccessary fabric. Don't forget to turn your tote right side out regularly to make sure the seams look good (especially here before you cut so that you can rip your seam if anything looks wrong).

You want the top of your tote to be even since it's going to show (unless you want to put a zipper in). Fold the fabric twice so that both the upper and the lower edge looks good.

Finally, it's time to sew the bottom layers together. Make sure the seam is tight and strong in the corners so that your tote won't break.

When you're done with the last step, you can turn your bag right side out and check that everything looks good. This is what mine looks like right now.

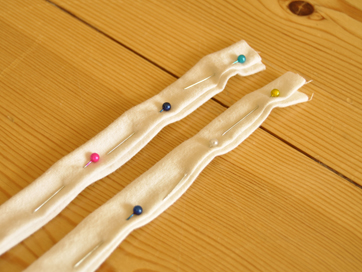
Now, you'll need some more fabric to make the straps for your tote. Choose any width and length you want, but make sure both the straps are of the same length. Mine are approximately 50cm long and 6cm wide (before folding the sides in, 2cm when I'm done folding). Remember that when sewing the straps on to your tote, about 4cm will disappear from each strap (2cm on each side).
Before sewing, make sure all the fabric is tucked in (fold both sides in towards the middle and then fold them over eachother). It'll look something like this:
After you finish the straps, it's time to sew them on to your tote. Put them on the inside and sew a square. If you want it to be even steadier, you can sew a cross in the middle to. I chose to only sew the square (unfortunately my sewing machine decided to act up on me around that time so my seam came out very weird). REMEMBER! Make sure that one strap is only in the front and the other one only in the back so they don't cross over from the front to the back. So many people make that mistake and everything comes out wrong.

Your tote should now be done! If you have any questions, don't hesitate to ask!